In Hydromagic, it is possible to add references to image files, like photo's on your maps. The image's will be showed on the map as a camera icons.
When clicked, the photo will appear. Possible application examples include:
In Hydromagic, there are multiple ways to add a photo. You can create one manually from the photo list,
or click on the map to store a photo on the current mouse position.
The easiest way is by clicking on the map. We will demonstrate in a few steps how to do this.
Zoom and pan over the map until you find the position you want to place a photo
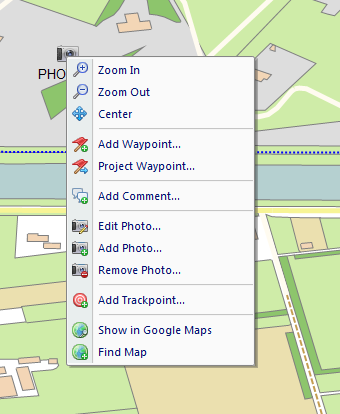
Click the right mouse button, when pointing the mouse to the position, and select the "Add Photo..." option. The "Add Photo" window will appear.
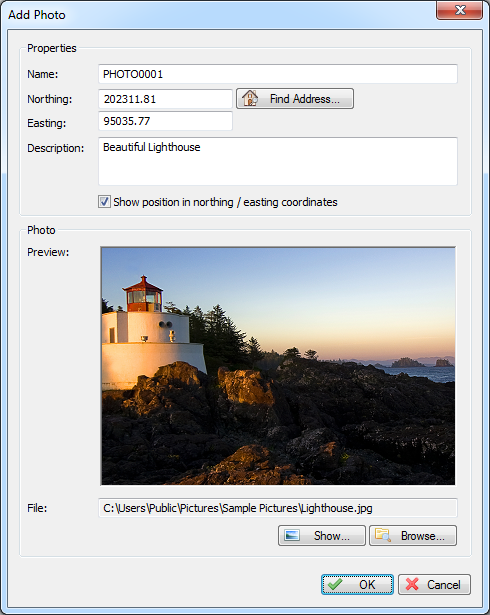
You will notice that the position of the photo is already filled. In this window, you can add a name and comment to store with the photo.
Also, you have to select an image file by clicking the "Browse..." button. At this moment, JPEG, GIF, BMP, TIF and PNG files are supported.
Please note that only the path to the image is stored in the project file. In case of a backup, you have to backup the image files manually.
Once the images are moved or deleted, the images can no longer be viewed from the map.
Use this field to set an unique name for your photo. This name is also displayed on the map below the camera icon and in the project view.
It is not possible to create more then one photo with the same name.
These positions are pre-filled when you create the photo by right clicking on the map.
If you are creating the photo from the photo list, the current position is used.
You can change these fields to display the Northing and Easting position using the currently selected local grid (if set), by checking the "Show position in Northing / Easting coordinates" check box. To find the position using geo-referencing, click the "Find Address..." button. You need to have an active internet connection to use this feature.
You can add a description for the photo here. This field is optional and can be kept empty.
Displays the full path to the image file. Click the "Browse..." button to select (another) file,
or click the "Show..." button to view the photo in the "Windows Photo Viewer" application.
After modifying the photo properties, click "OK". When using the settings from the screenshot above, the photo will be displayed on the map like this:

To modify the photo after you placed it on the map, you can use either the photo list, or right click on the photo, and select "Edit Photo...", as displayed below:
To move the photo, click on it and just drag it around on the map. When you release the mouse button, it's new position is saved.
This option will only work, when drag-and-drop is enabled (look for the "lock" button in the toolbar).

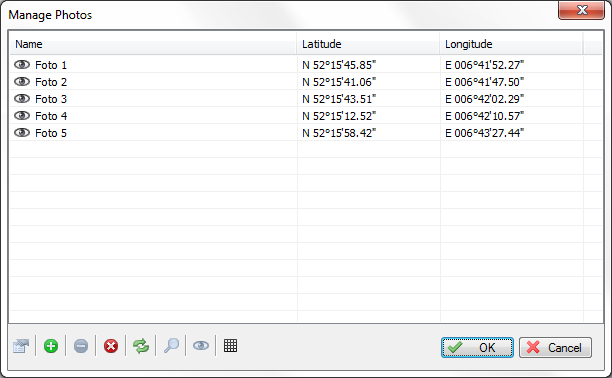
To view a list off all photo's on the map, you can open the photo list, by right clicking on the "Photos" folder in the "Project Explorer" and selecting "Manage Photos...". From this list, you can remove, add, modify, export and zoom to photos. If the "Project Explorer" isn't visible, you can show it by selecting "Project Explorer" from the "View" menu.