The Hydromagic Game Controller plugin allows you to command your autopilot, steer your USV or drone, or access frequently used Hydromagic functions from a wireless Xbox game controller. This controller can be obtained from almost any multimedia or gaming store, and won't cost you more than a couple tenths of Dollars. Installation is very easy, just plug the wireless USB dongle shipped with the controller into your PC or laptop and pair the controller with the receiver by pressing the pairing button on both the wireless receiver and game controller.
Together with either the Dynautics SPECTRE or MAVLink plugins, you can use the controller to steer your boat. For ArduPilot (MAVLink) devices, the thumbstick controls can replace your RC transmitter when a WiFi connection from the Hydromagic computer to the USV is available. Besides controlling your boat, you can also assign the buttons on the game controller to pan the map, start, pause or stop recording data files or to select the next or previous survey line.
The Microsoft Xbox game controller - Image courtesy of Microsoft.
To load this plugin, open the preferences window by selecting "Preferences..." from the "Options" menu. In the window that appears, select the "Devices" tab. Next click the "Add..." button.

The devices tab in the "Preferences" dialog.
A list of available plugins will be displayed. In this list, select the "Hydromagic XBOX Game Controller Plugin" plugin and click "OK" to load and display the configuration dialog.
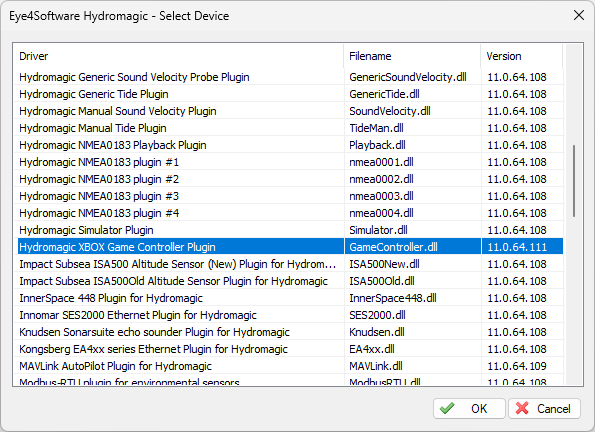
Select the "Hydromagic XBOX Game Controller Plugin" from the list of available plugins.
The configuration for this plugin is slightly different from most of the other plugins since you do not have to set any communication parameters like serial port, or network settings. The software automatically detects if the wireless dongle for the Xbox has been connected by using Microsoft's XInput programming API, so you only have to worry about the assignment of functions to the controller.
The configuration window for this plugin lists all available buttons, digital and analogue controls which are on the controller. Using the drop down boxes, you can select which function to assign to each of the controller's inputs. Please note that an analogue control can have different functions than for instance a button, which is digital and just provides an on or off status.
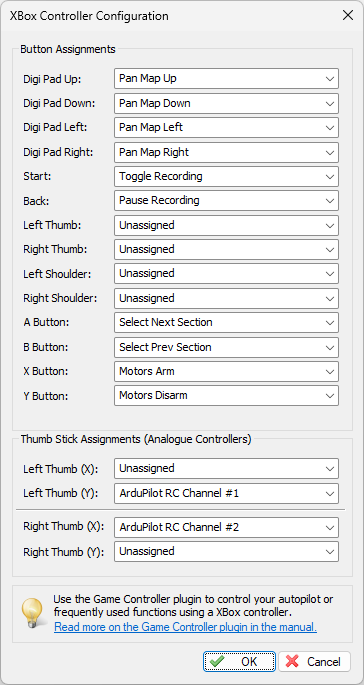
Configuration example for the Xbox game controller.
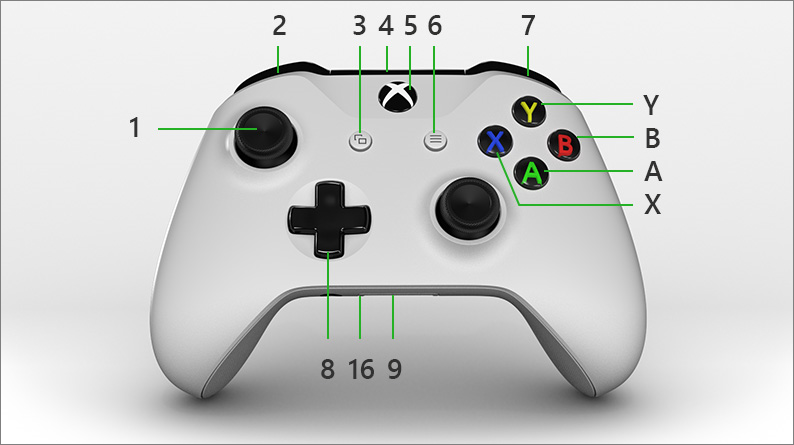
Please refer to the numeric labels on the image below to find out which any of the buttons are called. Please note that not all buttons are supported by Hydromagic. The stick controls are both analogue and digital. You can move them in X and Y directions, but pressing them will trigger a button action.
The Microsoft Xbox game controller buttons and controls - Image courtesy of Microsoft.
Which functions can be assigned to a control depends on the type of control. Analogue controls are in most cases used for steering of USVs (throttle, yaw or heading), while buttons are used to set the auotpilot mode or to access functions in the Hydromagic software. The following list contains all functions currently supported by the Game Controller plugin:
To ignore a button or (thumb) stick when it is pressed or moved, select the "Unassigned" value from the drop down list.
The panning functions can be assigned to buttons to use them to pan the map. This way you can easily pan the map view when the vessel is about to leave the visible portion of the background map. This function can be assigned to digital buttons only. It is recommended to use the directional pad (8) for this, or the colored buttons (X,Y,A and B). Assigning this function will simulate a click on one of the "Pan Up", "Pan Down", "Pan Left" and "Pan Right" buttons in the main Toolbar. These buttons are hidden by default, but can still be accessed by the Xbox controller in case they are set to hide.
If you want to start and stop recording a raw data file at the begin and end of a planned survey line or cross section, it would be a good idea to assign the "Toggle Recording" and "Pause Recording" option to one of the Xbox buttons. This way, you do not have to even use your laptop while recording data, just one press on one of the buttons will do the job.
When an Alarm sounds, and you know that it is safe to ignore, you can mute the alarm or hide the alarm notification on the map view by pressing the button which has the "Reset Alarm(s)" function assigned.
To switch between planned survey lines or cross sections while recording data (needed when using the helmsman or LR indicator display), you no longer need your mouse or laptop. Just assign the "Select Next Section" and "Select Prev Section" functions to two different buttons. You can use for instance the left bumper (2) or right bumper (7) for this. The easiest configuration to remember is to set the "Select Prev Section" function to the left bumper and the "Select Next Section" to the right bumper.
This function can be assigned to a button if you regularly want to add a marker to the echogram data recorded in Hydromagic, or to send an annotation to the paper or display of your echo sounder. For more information on how events and annotation marks are used, please refer to the "Events and annotation" page in the manual.
Assigning this function gives you the possibility of quickly add a waypoint or comment to the current GNSS position. To fill in more details for the waypoint of comment, or to store the waypoint or comment, you will need your full keyboard though.
These functions correspond to the autopilot modes on the Dynautics SPECTRE autopilot unit which can be fitted on the CEE HydroSystems CEE-USV. To easily remember which button is which autopilot mode, we recommend to program autopilot modes on the colored (A,B,X and Y) buttons. Please note that these functions cannot be used when using a MAVLink compatible autopilot like an ArduPilot (PixHawk or Cube).
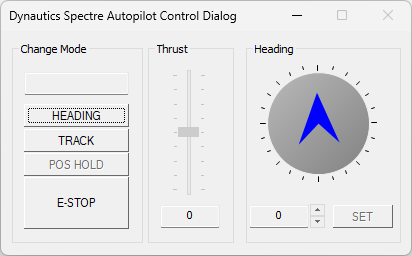
Autopilot modes supported by the Dynautics SPECTRE autopilot.
When using an ArduPilot, these functions can be used to arm, or in other words enable the motors on your USV. To check if the motors are armed, you can enable the "Drone" item in the data view.
The steering functions are used to set the heading for your Dynautics SPECTRE autopilot. These functions can not be used on an ArduPilot. The step size for both the fine and coarse steering setting can be altered in the Dynautics SPECTRE autopilot plugin. On an ArduPilot, the Xbox controller will simulate the RC channels of a RC transmitter instead of setting a course to follow.
The steering functions are used to set the throttle for your Dynautics SPECTRE autopilot. These functions can not be used on an ArduPilot. The step size for both the fine and coarse throttle setting can be altered in the Dynautics SPECTRE autopilot plugin. On an ArduPilot, the Xbox controller will simulate the RC channels of a RC transmitter instead of setting a fixed throttle setting.
Using the RC Channel functions (8 channels supported), you can use the Xbox controller to override or replace your wireless RC transmitter of your USV. The RC channel selected in the game controller plugin corresponds with the RC channel used on your transmitter. To see which function each channel has, you can check your ArduPilot's configuration using software like "Mission Planner" or "QGroundControl".
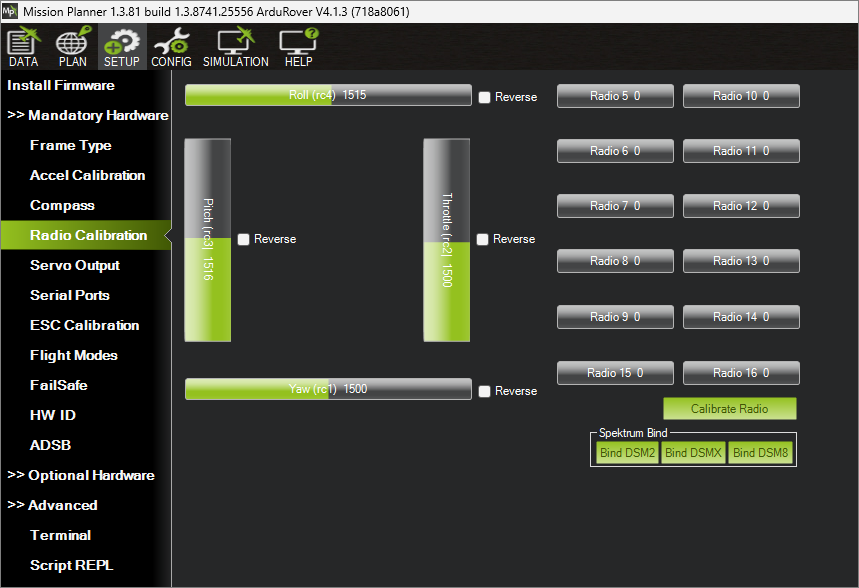
The RC Channel assignments can be found in Mission Planner.
To use ArduPilot functions in the Game Controller plugin, you should have loaded the "MAVLink communication plugin" plugin as well.
After configuring the plugin it will be loaded and its status will be displayed in the list of loaded plugins:
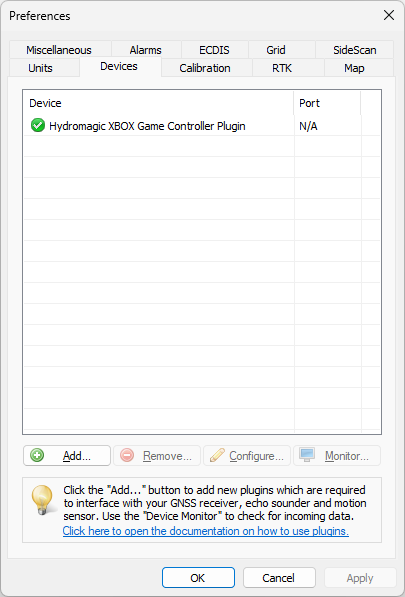
A green icon indicates that the controller is connected.
The name of the plugin is displayed in the list, together with the port that is used, in this example "N/A" since it does not use a network or serial connection. The hourglass in front of the plugin name indicates that the plugin was loaded, but a connection to the controller could not be made (for instance because it has not been switched on yet).
After switching on the controller, the hourglass should turn into a green icon indicating that the controller is connected and switched on. When a red icon with an exclamation mark is displayed in front of the plugin name, there was a failure loading the plugin or opening the connection to the device. In this case the cause of the error will be displayed in the real-time activity view.
To unload the game controller plugin, open the preferences window by selecting "Preferences..." from the "Options" menu. In the window that appears, select the "Devices" tab. Next select the "Hydromagic XBOX Game Controller Plugin" and click the "Remove..." button.
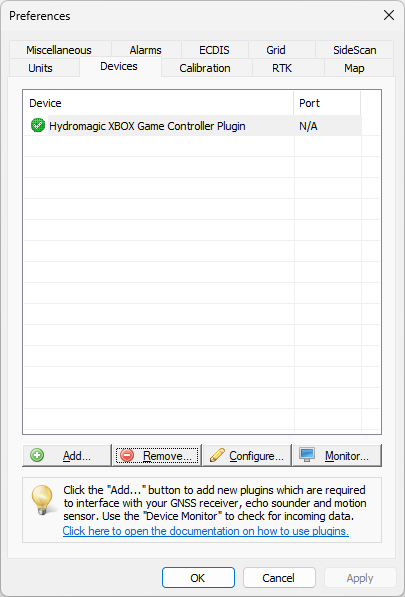
Plugins can be unloaded using the "Remove" button.