
Hydromagic Projects
Hydromagic organizes a set of background maps, raw data files, soundings, map overlays, and boundaries as projects. Each project has its own projection settings, surveyor's name, and associated project description, and is stored in a separate folder on the disk.
The project settings are saved in a "Hydromagic Project File" with the file extension ".HPF". These files are saved in XML format and, although not recommended, can be changed with any text editor.

Example of how a Hydromagic project is organized on disk.
Hydromagic project folders
Some folders, such as "Draft", "Reports", "Tides", and "Velocity" are intended to keep the project organized. The "Backups", "Maps", "Matrices", "Modified", "RawData" and "Soundings" folders are required to run the software and will be (re)created automatically by the software upon loading the project.
| Folder | Description |
|---|---|
| Backups | Folder to store backups from raw data files, the project file and the configuration |
| Draft | Folder to store dynamic draft configurations generated by the draft file editor |
| Logs | Folder to store user-defined dredging logs generated in Hydromagic Dredging |
| Maps | Folder to store imported and downloaded maps |
| Matrices | Folder used to store matrices generated from soundings or imported data files |
| Modified | Folder where modifications to raw data files are stored |
| RawData | Folder where raw data files are recorded during hydrographic surveys |
| Reports | Folder to store PDF reports generated by one of the volume calculation tools |
| Sidescan | Folder where imported side scan data files are stored |
| Soundings | Folder where soundings generated from raw data files are stored |
| Tides | Folder to store tide files generated by the tide file editor |
| Velocity | Folder to store sound velocity files |
Creating a new project
The first thing to do when you start working with the software is to create a project. That is, of course, when there is no project available to load. To create a new project, select "New Project..." from the "File" menu in the Hydromagic Survey application.
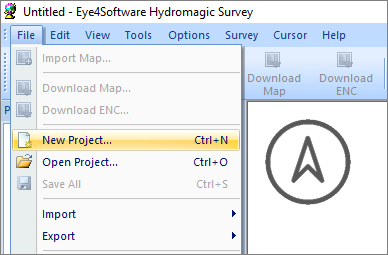
Select the 'New Project...' option to create a new project.
When a project is currently loaded, you are asked if you want to save or discard changes. The following dialog box is displayed. Just fill in the required fields and click the "Create" button to create a blank project.
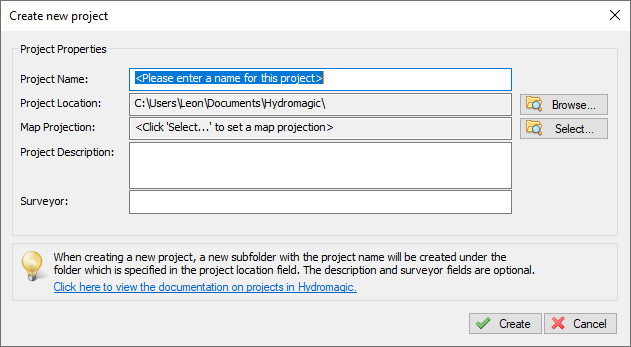
In the "Create new project" dialog, you can enter the project's name and coordinate system.
Setting project options
Project Name
Enter a descriptive name for the project. This name is also used as the folder name for the project on the disk. Note that this name cannot contain any of the following characters: ' | ', ' / ', ' * ', ' : ' ,' ? ', ' " ', ' < ' and ' > '. You cannot use these because Windows forbids them in file names.
Project Location
Here you can select the location where the project will be saved. By default, the "Hydromagic" folder is selected under the "My Documents" folder.
Map Projection
Select the map projection that will be used in this project by clicking the "Select ..." button. Please note that you cannot change the map projection after the project has been created..
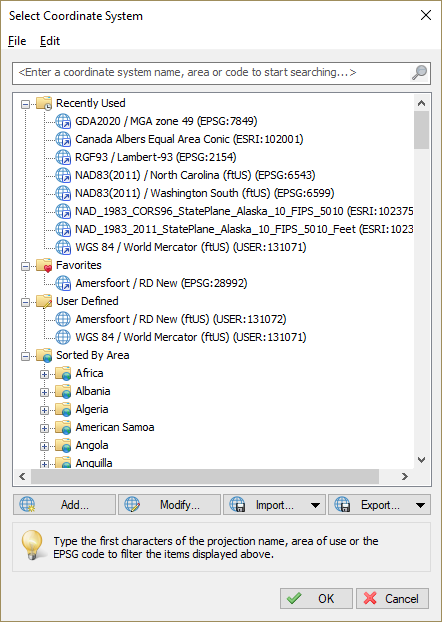
Select the coordinate reference system for your new project.
Project Description
You can enter a description for the project here. The use of this field is optional. The value of this field can be selected as part of the map footer text.
Surveyor
You can enter the name(s) of the surveyor(s) here. The use of this field is optional. The value of this field can be selected as part of the map footer text.
Project Explorer
Your project and its contents can be viewed and modified using the "Project Explorer". It can be used to download maps, import maps or data, remove items, starting utilities and much more.
In addition to the maps, you can also access raw data, soundings, side scan data, routes, waypoints, boundaries, and matrices here. For more options, just right-click with your mouse on an item to get a popup menu.
When the 'Project Explorer' isn't visible, it may be hidden or closed. To restore it, select the "Project Explorer" option from the "View" menu.
Backup projects
Using the 'Project Explorer,' it is possible to back up or archive your entire project with just a couple of mouse clicks. To do so, right click the project root in the "Project Explorer" and select the "Archive project..." option.
A file dialog will appear, allowing you to set the name and location of the output file. The backup can be written as either a ZIP, TAR or ISO file. Click "OK" to generate the file.
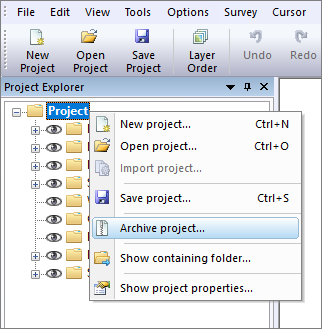
Select the "Archive project..." option
to send your project files to a ZIP archive.
Open project folder
To open a Windows Explorer window containing the contents of the project, right click the root of the project in the "Project Explorer" and select the "Show containing folder..." option. This might come in handy when, for instance, you want to manually copy or backup files from or to your project.
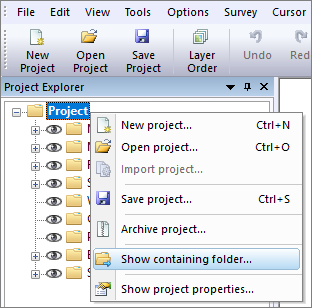
Select the "Show containing folder..." option
to view your project files in Windows Explorer.
Alter project properties
This function can be used to alter some project properties like the surveyors name and the project description. It is not possible to change the projection, units, and project name once a project has been created. To use a different project after your survey, just create a new project with the correct projection, and import the recorded raw data files.
To show or modify these properties, right click the root of the project in the "Project Explorer" and select the "Show project properties..." option. When done editing, just click the "OK" button to store the modifications.
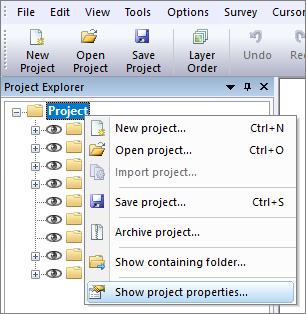
Select the "Show project properties..." option
to view or alter project properties.
Cloning a project
This feature has been added since version 9.0 after having a couple of requests for it. In some scenarios you will survey the same area a couple of months later, but you would like to have a separate project without going through the map download, drawing of the boundary and section generation again.
This is where the 'Clone Project' function comes in handy. You can let Hydromagic generate a new project for you based on an existing project. You will be able to choose the new project name as well as which items will be copied from the existing project.
To clone a project, right click the root of the project in the "Project Explorer" and select the "Clone Project..." option:

Select the "Clone Project..." option to
generate a customized copy of your project.
The following dialog should now appear, already showing you a suggestion for the name of the new project. Of course you can alter the project name to suit your needs. By default, the root folder should contain the location where all your projects are. If you are using a different location for your project root, you might want to change the "Project Folder" value by clicking the "Browse..." button.
From the tree, select the items you want to keep in the new project. In most cases this includes the maps, boundaries and sections. After selecting the items, click the "OK" button to create the new project. When the project has been created successfully, you can click the "Yes" button in the message box that appears to load the newly generated Hydromagic project. In case of problems, you can always check the content of the Activity View's "Processing" tab.
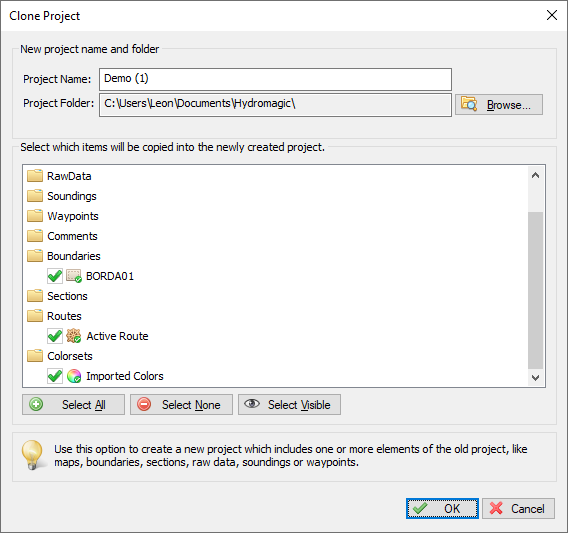
Select the items you wish to transfer to the new project, and click 'OK'.
Video Tutorial
The following YouTube video tutorial shows how to create a blank project in Hydromagic. Click below to play the video. When you like the video, please click the like button and subscribe so you will receive an update when new video tutorials on Hydromagic are uploaded.
Start a blank project in Hydromagic and select a map projection.